Section 1: Overview
Since ChatGPT resides in the cloud, it cannot directly reach the localhost services running on your local machine.
To bridge this gap safely, DashDraft creates a secure, encrypted HTTPS tunnel to your computer using ngrok. The DashDraft GUI App manages this tunnel lifecycle entirely—including token storage, custom domain parameters, and startup/shutdown operations—in a single click.
Section 2: Prerequisites
- DashDraft GUI App: Installed and currently showing a green Running status badge.
- ngrok Account: A free account registered at ngrok.com.
- ChatGPT Account: A standard free or premium account on ChatGPT.
Section 3: Setting Up ngrok Token via GUI
Step 1: Retrieve Your ngrok Authtoken
- Sign in to your ngrok Dashboard.
- Navigate to the Your Authtoken section in the left sidebar navigation menu.
- Copy your full personal authentication token. (It will resemble a long key like:
2abc123_your_token_here_abc123...).
Step 2: Save the Authtoken in the GUI
- Open your DashDraft GUI App and scroll down to the ChatGPT Cloud Tunnel card.
- Paste your copied token into the NGROK AUTH TOKEN input field.
- Click the blue Save button adjacent to the input field.
Note: Your token is stored entirely locally on your hard drive and is never shared with or sent to DashDraft's servers.
Step 3: (Optional) Configure a Static Domain
By default, ngrok issues a random public URL every time the tunnel is restarted. To prevent having to update ChatGPT every time you reboot your computer, you can configure a free static domain:
- Go back to your ngrok Dashboard and click on Cloud Edge → Domains in the sidebar.
- Click Create Domain to claim a free static subdomain (e.g.
subtle-primary-camel.ngrok-free.app). - Copy that domain name string.
- Return to the DashDraft GUI App and paste it into the STATIC DOMAIN (OPTIONAL) input field.
- Click Save.
With a static domain saved, your tunnel address will remain stable indefinitely!
Section 4: Starting the Tunnel via GUI
Step 1: Start the Tunnel
Inside the ChatGPT Cloud Tunnel section of the GUI, click the blue Start Tunnel button.
Wait 5–10 seconds for ngrok to initialize the tunnel. Once established, the status badge will change to a green Tunnel Active indicator.
Step 2: Copy the Public HTTPS URL
The GUI will display your active public endpoint. Click the blue Copy icon button next to the URL to copy it.
GUI ChatGPT Tunnel Interface
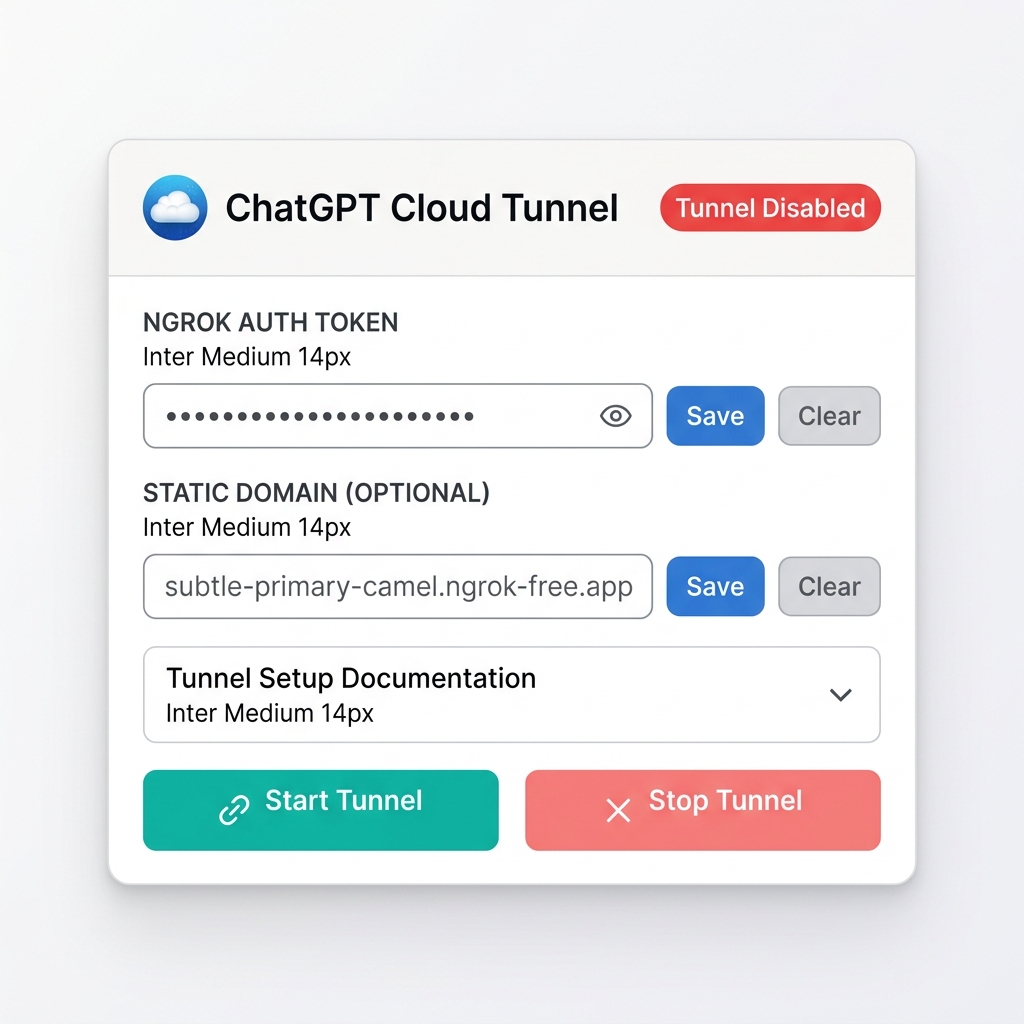
- NGROK AUTH TOKEN: Clean masked password storage showing token is saved locally.
- STATIC DOMAIN: Inputted domain keeping endpoints stable.
- Tunnel status indicator: Displays active green status signaling cloud communication is active.
- Copy URL button: Instantly copy the endpoint with one click.
Section 5: Connecting ChatGPT to the Tunnel
Step 1: Enable Developer Mode in ChatGPT
- Open ChatGPT in your web browser.
- Click your Profile Picture in the bottom-left corner and go to Settings.
- Select Apps in the menu.
- Scroll down to the Advanced Settings category.
- Toggle the Developer Mode switch to ON.
Step 2: Create your local custom MCP App
- While still in the Settings → Apps menu of ChatGPT, click Create App.
- Fill out the registration details:
- Name:
DashDraft - MCP Server URL: Paste the copied HTTPS tunnel URL (e.g.
https://xxxx-xxxx-xxxx.ngrok-free.app/mcp)
- Name:
- Click Save or Create.
Step 3: Test the ChatGPT integration
Open a new chat tab, attach the app from the more option in chat attachments dropdown, and type a workspace diagnostic query:
"What tables are in my active workspace?"
ChatGPT will recognize the DashDraft MCP server schema, query your local database through the secure ngrok tunnel, and list your tables directly inside your browser chat!
Section 6: Managing Your Tunnel
- Changing your Token: Click the Clear button next to the authtoken input, paste a new key, and click Save.
- Changing your Domain: Click Clear, paste your new domain string, click Save, and restart the tunnel by clicking Stop Tunnel followed by Start Tunnel.
- Reviewing Tunnel Logs: Scroll to the bottom of the GUI app and expand the Advanced Console section to view real-time ngrok connections and data flow logs.
Section 7: Troubleshooting
- "Tunnel Disabled" status: Verify that your Core Service status at the top of the GUI displays a green Running status badge, and double-check that you clicked Save on your token.
- "Connection Refused" in ChatGPT: Make sure the GUI app remains open, that the "Tunnel Active" badge is displayed, and that the URL entered in ChatGPT matches the active HTTPS URL in the GUI exactly.
- "Invalid Token" error: Re-copy your authtoken string from the ngrok panel, ensuring no leading or trailing spaces are copied, paste into the GUI input, and click save.
- "Static Domain not working": Ensure your static domain is created and listed as active inside your ngrok dashboard. Note that free ngrok domains might require active renewal.
- Manual command fallback: For scripting or manual CLI setups, check out the Advanced: Using the CLI page.